Showing posts with label crafts. Show all posts

Friday, June 12, 2009

Recycled Decorating

I recently got a few scrabble games at a yard sale for my newest Etsy item but I didn’t want to just throw out the game boards and letter holder things so I searched online for some ideas for how to use them.

For the game board you can glue pictures of family members then glue their names on with scrabble tiles. Or you can glue the letter holder things onto the game board and use it like a picture ledge.

Here’s what I chose to do with some of the letters and the holder thing…

IMG_0569

I just glued the letters on and I’m going to give it a coat of Mod Podge. I made two other ones with my kids names on them. They can just sit on any shelf for a little decoration. 

Wednesday, April 15, 2009

Crafty Wednesday

Sickness has attacked our house again. This time we all got it. I’m much better now and managed to finish my kitchen cabinet transformation. I’ll post that tomorrow. For today it’s a quick art project…

All you need is a piece of paper, a frame, a stamp, ink and some markers.

IMG_0461

I just used a dollar stamp from Michael’s and stamped him on a piece of white paper. I used my Copic markers (LOVE THEM!) to color him in. Added a little decorative border and cut the paper to the frame size.

IMG_0462

IMG_0513

Wednesday, March 25, 2009

Crafty Wednesday

The little get together after my girl’s baptism turned into an even smaller get together so I changed my plans some.

I went with an easier and simpler centerpiece.

IMG_0475

The buckets came from Target’s $1 spot and here’s a tutorial for the Dahlia flower. I just stuck a piece of floral foam in the bucket so the stick for the flower would stand up then covered the foam with some gift basket filler stuff.

I also made a quick and easy favor.

IMG_0476

IMG_0477

Seed packets were 10 cents from Dollar Tree. I cut a strip of scrapbook paper and wrapped it around. I used a baptism stamp, colored it in, and punched it out. I printed the poem and glued everything together.

Wednesday, March 18, 2009

Crafty Wednesday

My girls are getting Baptized on Sunday and we’re having a little get together after so I’m in the midst of making some centerpieces and stressing out over the preparations. I’ll post photos of them when I’m done but for now I’ll show you my inspiration photo.

Thursday, March 12, 2009

Crafty Wednesday

On Thursday...oops!

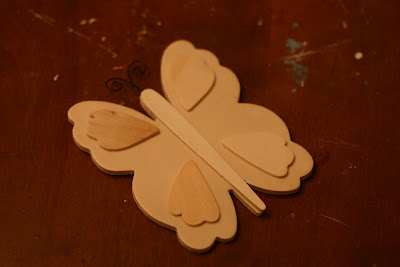
I made this ribbon holder for my oldest's room.


It's just an unfinished butterfly I picked up at Michael's.


I gave it a coat of white paint.


On the raised parts I mod podged some toile scrapbook paper.


Add a strip of ribbon to the back, I picked mine up at Dollar Tree (I just found out they had ribbon), a picture hanger and ribbon, attach to your wall then your ready to hold your clips.


Hopefully now I won't be running around trying to find a clip when we were supposed to leave 5 minutes ago.

Wednesday, March 4, 2009

Crafty Wednesday


Another card today...I'm working on something better for next week. I used another $1 stamp. the card is the same size as last week. The background paper is by Amuse (love them!) The "thanks" I stamped on white paper and used a scalloped square punch. I attached it to the green paper (don't remember the brand) with pop dots. Add a little ribbon and a button and you have yourself another handmade card!

Wednesday, February 25, 2009

Crafty Wednesdays


I recently started getting into card making. I love creating things and I love not spending $3 for a card. My favorite stamps are from the $1 bin at Michael's and AC Moore.


OK, you ready for a bad tutorial... I used one of my $1 stamps, stamped with black ink on white paper and colored it in with Copic markers. I LOVE them! I hand cut the oval (an oval punch is still on my wish list) and mounted it on a scrap of blue cardstock. I used American Crafts paper (The Goods-Lil' Man and Champ). The piece of paper measured 8 1/2" x 5 1/2" and just fold in half. I glued on a 2" strip of the coordinating paper and punched the pretty edge. I tied coordinating American Crafts ribbon around the oval and attached it to the card with pop dots. Very quick and easy to make!

Wednesday, February 18, 2009

Crafty Wednesdays

Let's see how long I can keep this up...

My husband was deployed to Iraq this past year and we had a big Welcome Home party for him this summer. This is what I made for the centerpieces.

The star was an unfinished box from AC Moore. I painted it red and covered the front and back with scrapbook paper. I did the same thing to a small wooden star that I glued to the front of the box, then I tied a ribbon around the whole thing. I stamped "HOME" on a piece of white paper, put two eyelets in it, inked the edges and glued that on the front. I also inked the edges of the box. The picture sticks are just a dowel cut up into different sizes and I glued on an Aligator clip (I found them at Walmart in the electrical supplies) then spray painted them black. I stuck the sticks into a piece of floral foam then filled it in with shredded paper (the gift basket filler stuff).

These were the favors. I filled them with red, white and blue M & M's.

They're called Sour Cream Containers. Here is a better tutorial than I can do. I used a 4 x6 piece of paper instead. I saw one on another site that used a 4x6 photo to make them.

You could also use these ideas for a 4th of July party or a red, white, and blue themed birthday party.