Showing posts with label Projects. Show all posts

Thursday, August 6, 2009

Pier 1 Knockoff

I was in pier 1 this weekend and saw these awesome jars and glasses with little chalkboards on them.

I decided to create my own with a jar I already had…Project cost: free!

I just taped off where I wanted the chalk board paint…

IMG_0249

Then just spray your chalkboard paint…

IMG_0290 

Then when you take the tape off you get this…

IMG_0292

Here is Zoe’s new treat container…

IMG_0294

Love it!

Thursday, July 2, 2009

A Tree Has Grown

After looking at kid’s room on HGTV’s Rate My Space I saw quite a few rooms with tree or flower silhouettes on their walls. I really wanted to copy the idea for Madison’s wall  to break up some of the purple. I found a tree picture online, printed it out and sketched it onto the wall in pencil. It took awhile because I kept going back and changing a little here and adding a little there. When I thought I was happy I started painting it in with leftover white paint. Well the idea looked better in my head than it did on the wall. After one coat of paint I wasn’t sure if I wanted add a second probably third coat in hopes it would look better or scrap the whole idea and repaint the purple.

IMG_0634

Then I saw this post on It’s the Little Things That Make a House A Home.

LOOK at that tree! The whiteboard idea is great but for my tree I’ll stick with regular white paint since the tree is behind her bed and just for decorate purposes. This would be a much easier idea and much easier to paint. And it was…

100_0165

I cut leaves and a bird out of leftover fabric from when I made her crib bedding and ragamuffin garland and curtains (which are now in McKenna’s room) then I stiffened them with “Stiffy” and glued them on the wall. I love how it’s 3D (although kinda hard to tell from the picture)

Tuesday, June 30, 2009

$24 Wall Art

When I saw some starfish in one of my new favorite stores (check that post out later this week) I knew I wanted to use some in my new/future bedroom. They were $1.75 a piece. While I was visiting my parents house I saw a bunch of frames they had bought on clearance at Michael’s. They were just my style, black with a distressed finish so I bought them from her.  The smaller ones (holds an 8x8 piece of paper) were $4.99 and the bigger one (holds an 11x14 piece of paper) was $6.99! So I decided to frame the starfish in them but instead of just using a blank piece of paper I printed out a few of my favorite quotes on cardstock then just cut the paper to size and glued on the starfish.

100_0167

100_0168

“Each day when you awake know that you have one more day to make a difference in someone’s life.”

- James Mann

100_0169

"Life is not about waiting for the storm to pass, it’s about learning how to dance in the rain."

- Anonymous

100_0170

“It is good to have an end to journey towards; but it is the journey that matters, in the end.”

- Ursula K. Le Guin

I have my priorities straight…I made art for a wall in my bedroom before I even started tearing off the wallpaper! So this is the direction I’m going in modern coastal….Is that a style?

Friday, June 12, 2009

Recycled Decorating

I recently got a few scrabble games at a yard sale for my newest Etsy item but I didn’t want to just throw out the game boards and letter holder things so I searched online for some ideas for how to use them.

For the game board you can glue pictures of family members then glue their names on with scrabble tiles. Or you can glue the letter holder things onto the game board and use it like a picture ledge.

Here’s what I chose to do with some of the letters and the holder thing…

IMG_0569

I just glued the letters on and I’m going to give it a coat of Mod Podge. I made two other ones with my kids names on them. They can just sit on any shelf for a little decoration. 

Wednesday, June 10, 2009

Faux Locker Baskets

I’ve been waiting for some locker basket to come my way for the bench in my “mudroom”. I was in Walmart picking up some white spray paint when I saw Hammered Finish spray paint. Hmm…that got me thinking. I had seen plastic baskets before like this….

IMG_0571

What if I used the hammered spray paint to make it look like galvanized metal…

IMG_0574

$5 for the spray paint and $3.50 for the basket it was worth a try.

IMG_0573

Not too bad..I held it up to my real galvanized metal bins and it looks pretty close. Just don’t touch it!

I have these little metal book plate things in my scrapbooking stash. I’m going to print out a number and attach it to the basket.

IMG_0576 

Of course I just won an auction on Ebay for some real locket baskets I had bid on awhile ago, but these will do until they arrive….

Tuesday, June 9, 2009

Paint Transformations

I got out the can of spray paint again…I had to try out Kimba’s spray painted glass idea. I was too excited to do this project I didn’t stop to take before pictures. So here are the afters….

IMG_0566

IMG_0567  

This was a little glass jar I got at a yard sale for 25 cents.

IMG_0568

The little jug bottle I got at a yard sale for 25 cents and the other bottle I got a Michael’s it was 99 cents then I used a 50% off coupon. It has a little cork but I forgot to put it in for the picture.

IMG_0565

This was an old coffee tin my mom had just gave it a coat of spray paint and used rub on letters to spell out recipes.

Monday, May 11, 2009

Faux Mudroom

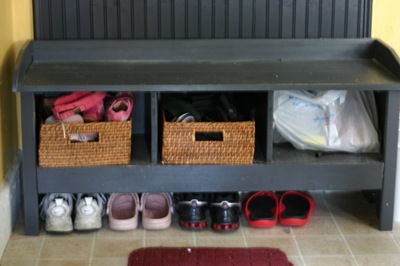
Once again my house is small so I have to do without a lot of the "luxuries" that many of you have. I'm very jealous of all of you that have a mudroom! Alas, I had to make do with what I have and created a "faux mudroom"

The idea started when I bought this buckboard bench at AC Moore. I got a really good deal on it. At the time I bought it they had a 50% off 2 items coupon. The way the coupon worked was that they took 50% off the highest priced item and then 50% off the next highest priced item. They took the discount off the bench and then it was still the highest priced item so their register took the discount off the bench again, so I got a $100 bench for $25!

IMG_0421

Then I found this coat rack at an unfinished wood store for $80 and used a 20% off coupon.

IMG_0420

One step of this process was to finally get rid of the bead board to nowhere. I have no idea why it just stopped but it has been driving me crazy. I've tried many things to cover it up but nothing seemed to work in that space. So I started by cutting into the railing where I wanted it to stop and prying it off. Then I covered it all up with the venetian plaster that I had originally put on the walls (I don't know why I didn't think about doing this when I had worked on the walls in the first place).

IMG_0402

Then I added beadboard and some moulding and gave everything a coat of my leftover black cabinet paint.

IMG_0533 I got the bins at Ikea this past weekend. (the camera is crooked not the shelf)

IMG_0536


IMG_0535

I’m looking for locker baskets for these three spots.

IMG_0537

We’re eventually getting new countertops and they are going to extend a little longer than they do now so I left a little of the railing up to stop where the new countertop will stop which will be even with the upper cabinet.

Head over to Between Naps On The Porch for some more before/after projects.

Thursday, May 7, 2009

Instant Project

I love when things are easy! I found a bag of old wooden spools at a consignment store for $10 and these two were perfect for candle holders. No need to do anything!

IMG_0524

IMG_0526

Check out Thift Store Thursday over at Homebody Holly for more ideas.


And Thifty Thursday at Bloggeritaville.

Wednesday, March 25, 2009

Crafty Wednesday

The little get together after my girl’s baptism turned into an even smaller get together so I changed my plans some.

I went with an easier and simpler centerpiece.

IMG_0475

The buckets came from Target’s $1 spot and here’s a tutorial for the Dahlia flower. I just stuck a piece of floral foam in the bucket so the stick for the flower would stand up then covered the foam with some gift basket filler stuff.

I also made a quick and easy favor.

IMG_0476

IMG_0477

Seed packets were 10 cents from Dollar Tree. I cut a strip of scrapbook paper and wrapped it around. I used a baptism stamp, colored it in, and punched it out. I printed the poem and glued everything together.

Thursday, March 19, 2009

Adventures With Spray Paint

Why did it take me this long to discover spray paint? All the wonderful blog ladies out there have given a new meaning to the word. They have done things I've never even thought of. I've finally realized just to look at the shape of something and not the color. Spray paint fixes everything!

IMG_0417

I picked this ugly rooster and bunny up at Family Dollar. The bunny was $1 and the rooster was $2.

IMG_0436

A coat of glossy white spray paint and they’re beautiful!

IMG_0428

IMG_0427

I got these four birdies at Dollar Tree.

IMG_0438

IMG_0439

Just some pink and white paint and they are good to go.

IMG_0332

This shelf didn’t match anything in the room.

IMG_0434

Much better!

IMG_0381

I really liked this lamp but it didn’t look right on a black table.

IMG_0435

So I gave it a coat of glossy white spray paint!

Now go grab some spray paint and transform some ugly things into pretties.

Monday, March 16, 2009

A Quick Project

I was flipping through magazines at CVS while waiting for ANOTHER antibiotic prescription (I should buy stock in the pharmaceutical companies) and came across a neat idea. I liked it even better because I had the materials already at home so I decided to make one myself. All you need is a vintage hand blender thingy, a small wood plaque and some paint.


Paint the plaque the color of your choice.


Then just nail or screw the blender thingy into the plaque.


You can use it to hold recipe cards, notes, etc...
Now to find a place to put it...